Last updated on 28 August 2020
If you’re following me on any of my social media you might already have spotted that I have released some Ansible roles lately. These Ansible roles are aimed at automating a red team infrastructure setup over AWS.
This blog will talk about what that means exactly and will be divided into two parts:
1. (this blogpost) will talk about what a typical red team infrastructure looks like and how to use the Ansible roles I’ve written.
2. will talk about applying Ansible roles to provision the infrastructure that we deployed in part 1.
What is Ansible
Ansible is a configuration management framework aimed at system engineers to provision and maintain large infrastructures. It has a ton of built in modules ( which include modules to interact with AWS).
It’s a fairly incomplex framework to use, which makes it an ideal candidate for provisioning our infrastructure. There are a ton of other frameworks around for this, such as Puppet and Terraform
Ansible works with “playbooks“, which are a set of instructions that will be applied to the infrastructure the playbook targets.
To target infrastructure, Ansible uses an “inventory“. This can be static or dynamic, as Ansible provides options to add hosts to the inventory on the fly.
Ansible also has something called “Roles”, which are playbooks that can be reused and shared with the world.
Since I had a decent Ansible foundation because of my excellent teacher Bert Van Vreckem when I was studying for my BA Computer Science and since I stumbled upon this post from trustedsec: automating RedELK deploys using Ansible, I decided it was only natural to brush of my Ansible rust and use it for this project.
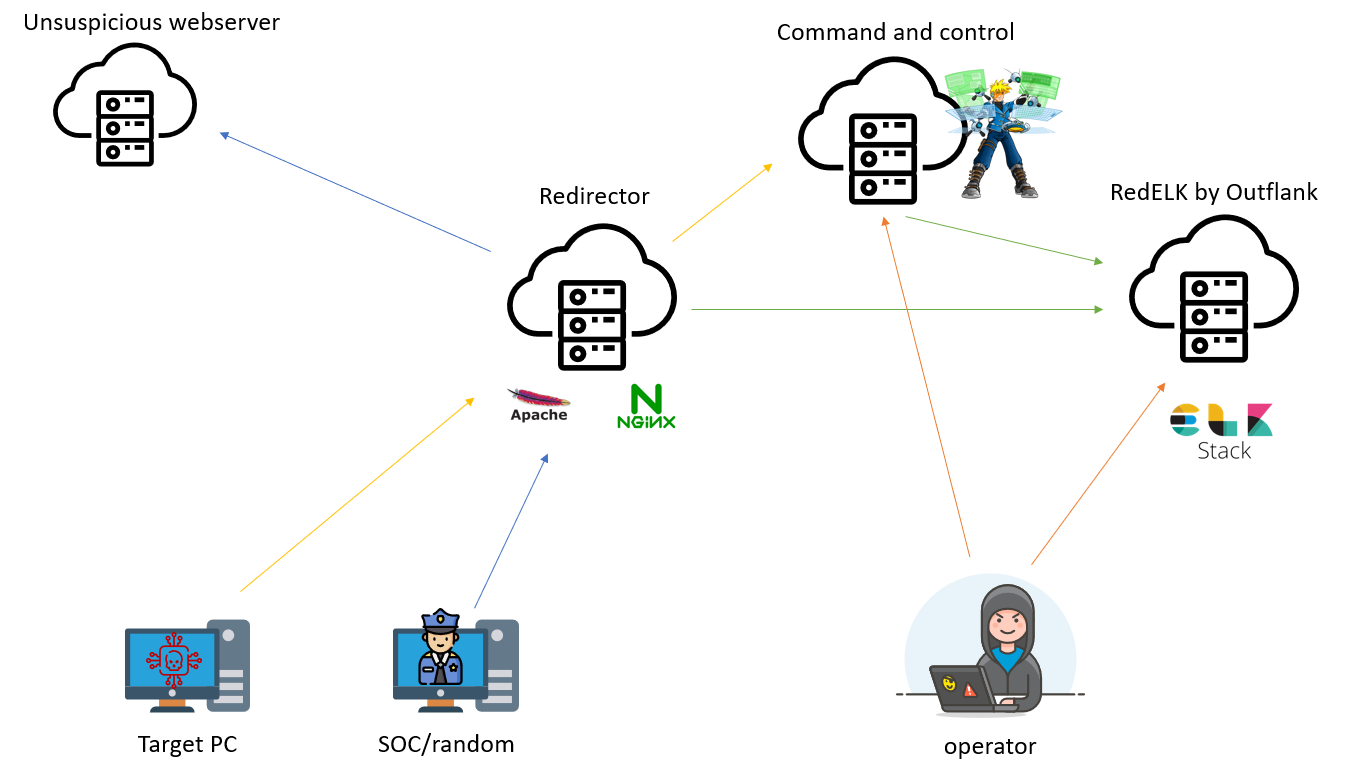
What does an average red team infrastructure look like?
This is the part where it gets dangerous for a blogger to write about. This will always be an opinionated view. Each company has its own way of working and views might differ across red teams around the world.
Below you’ll find my own (probably biased) view in how infrastructure should look like, at least from a bare minimum point of view, which can be expanded upon based on the goals of the assessment (for example mail infrastructure could be added in case you are planning on doing phishing).
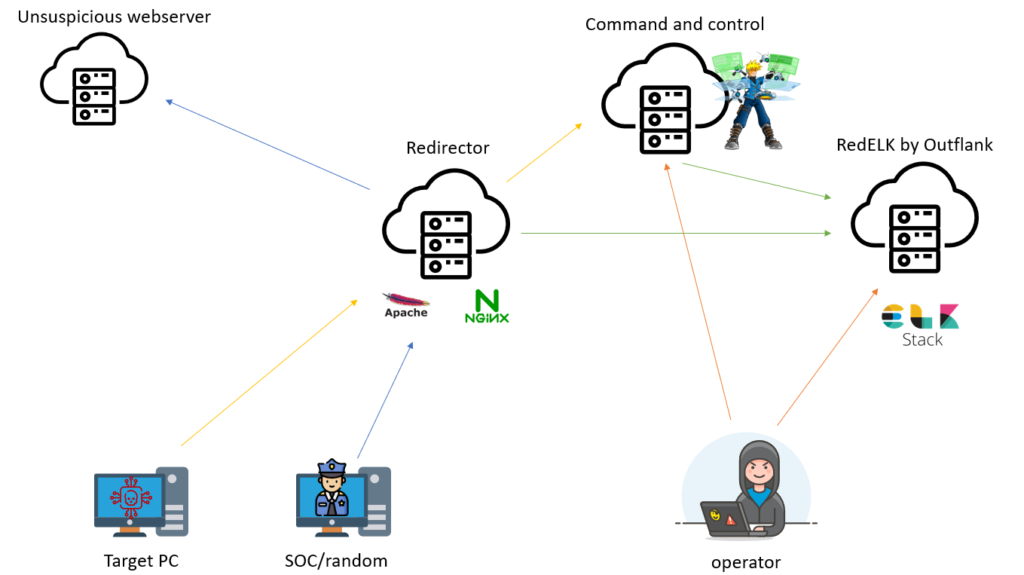
Ideally, every assessment, the infrastructure should be torn down and rebuilt from scratch. Not only is this better for the operator, as it won’t pollute logs cross assessments, it’s also required for compliance reasons. Setting up this infrastructure every time can be a time consuming and somewhat annoying task. Which is why we want to automate this!
In comes the first Ansible role: Red-EC2
The first role we are going to discuss will take care of setting up the bare EC2 infrastructure for the Command and Control, Redirector and RedELK.
The role can be found here: https://github.com/jfmaes/Red-EC2
The documentation over at GitHub should, theoretically, be enough to get this role up and running. I’m not intending to copy paste the documentation into this post, as it would make it unnecessarily bloated. However I’ll make this post compliment the GitHub documentation for the people less familiar with Ansible.
An Ansible layout should look like this:
Red-Inventory                # inventory file (optional for this blogpost)

group_vars/
   C2.yml                   # here we assign variables to particular groups
   Redirector.yml
   RedELK.yml

host_vars/
   localhost.yml          # here we assign variables to particular systems
   hostnamexx.yml

library/                  # if any custom modules, put them here (optional)
module_utils/             # if any custom module_utils to support modules, put them here (optional)
filter_plugins/           # if any custom filter plugins, put them here (optional)

site.yml                  # master playbook


roles/
Red-EC2
Red-Route53-Dynamic
The only really important parts of the above example layout for part 1 of the blogpost series are:
- the localhost.yml in host_vars,
- the site.yml file
- the roles in the roles folder.
The localhost.yml file
As this role is intended to be used on the localhost, all role variables listed on the GitHub documentation can be overridden here. Here is an example of the localhost.yml file to get you started:
As a reminder, this role will NOT create security groups for you. The security groups used for the instances should already be created and available in AWS.
# ec2_region is eu-west-1 by default, comment this out to change your region.
#ec2_region: eu-west-1

#auth keys for AWS. the IAM you use will need full access to EC2 and R53 can be placed here or exported in your systems environment variables like this:
#export AWS_ACCESS_KEY_ID='AK123'
#export AWS_SECRET_ACCESS_KEY='abc123'

aws_access_key: "fakeaccesskey"
aws_secret_key: "fakesecretkey"


#==================C2 specific vars=================================

#ami is by default kali, comment this out if you want some other AMI
#c2_ami_id: ami-0b7668b6cfbce14eb

#The security group in your AWS you'd like your EC2 to be linked to.
c2_security: C2-Security

#The SSH key you'd like to use. (if SSH key does not already exist in AWS, this role willl create it for you and place the .pem in the directory you launched the main playbook from.
c2_key_name: C2-Project-xx

#The instance name
c2_instance_name: C2-Project-xx

#by default, 1 C2 server is being spun up, if you want multiple, uncomment this var.
#c2_amount: 2

#================== Redirector specific vars=================================
#redir_ami_id: ami-0b7668b6cfbce14eb
redir_security: Redirector-Security
redir_key_name: Redirector-Project-xx
redir_instance_name: Redirector-Project-xx
redir_amount: 1

#================= RedELK specific vars=================================
#redelk_ami_id: ami-0b7668b6cfbce14eb
redelk_security: RedELK-Security
redelk_key_name: RedELK-Project-xx
redelk_instance_name: RedELK-Project-xx
redelk_amount: 1

#================== SSH STUFF ===========================
ssh_key_dir: "{{ ansible_env.HOME }}/"
The Roles directory
Clone the Red-Route53 GitHub repository and copy the Red-Route53 role in your roles directory
The site.yml file
The site.yml is very basic for this play, it looks like this:
- hosts: localhost
  roles:
   - Red-EC2
In comes the second Ansible role: Red-Route53-Interactive
This role is intended to manage the DNS for your red infrastructure, and can be found here: https://github.com/jfmaes/Red-Route53-Interactive
Setup for this role is the same as for the EC2 role, the role is intended to be started from localhost as well so all you have to do is clone the repository and copy paste the role into your roles directory.
update your site.yml to include the role:
- hosts: localhost
  roles:
   - Red-EC2
   - Red-Route53-Interactive
In case you want to override any of the variables, you can do it in the localhost.yml file.
As the name of the role suggests, this role is interactive, I will release a non interactive role soon(ish). The reason why this role is interactive is because you can have more than 1 instance of each type, and you might want to use different domains for all the infra.
Making an interactive role was the most elegant solution in my opinion.
The non-interactive role will be released with the caveat that it will only manage DNS for 1 (or maybe 2) of each instance at most. When the non-interactive role is released, and you want to use that one, just change from Red-Route53-Interactive to Red-Route53 (and clone the respective GitHub Repository in the roles directory).
Bringing it all together
Run the play, and be sure that you can actually access your instances (security groups defined in the EC2 role). If you applied a security role that makes SSH unavailable on your current network, the role will hang on the “SSH check” task.
Grab a coffee, as spinning up instances is not the fastest task ever. when you come back, a prompt will be waiting for you to provide some A records for your infra (if you decided to use the Route53 role). Once the records are provided, enjoy your red team infra, ready to go!
ansible-playbook site.yml
Conclusion:
Using Ansible, the daunting task of restaging infra for each assessment becomes as easy as running 1 command. Pat yourself on the back and grab a coffee or beer. Your job just became easier!
In part 2 of this blogpost series, we will discuss applying roles to infra specific hosts, such as applying my cobalt-strike ansible role on the C2’s we just spun up.

Be First to Comment